blog.v2 is a high-performance, minimalistic, and feature-rich blog template built with NextJS 15.
I created this blog template to address the need for a high-performance, minimalistic, yet feature-rich blogging platform. The inspiration and journey behind creating this project are detailed in my article: New Blog. Who Dis?.
- ⚡ Built with NextJS 15 App Router for optimal performance
- 🔍 SEO optimized blog posts with automated sitemap generation, Open Graph, Twitter Card, and JSON-LD (Schema.org)
- 🌓 Dark mode/light mode switch with no flicker and automatic theme preference detection (based on user's OS settings)
- 📝 MDX integration for writing blog posts using Markdown and MDX syntax
- 📱💻 Fully responsive design for optimal viewing on mobile and desktop devices
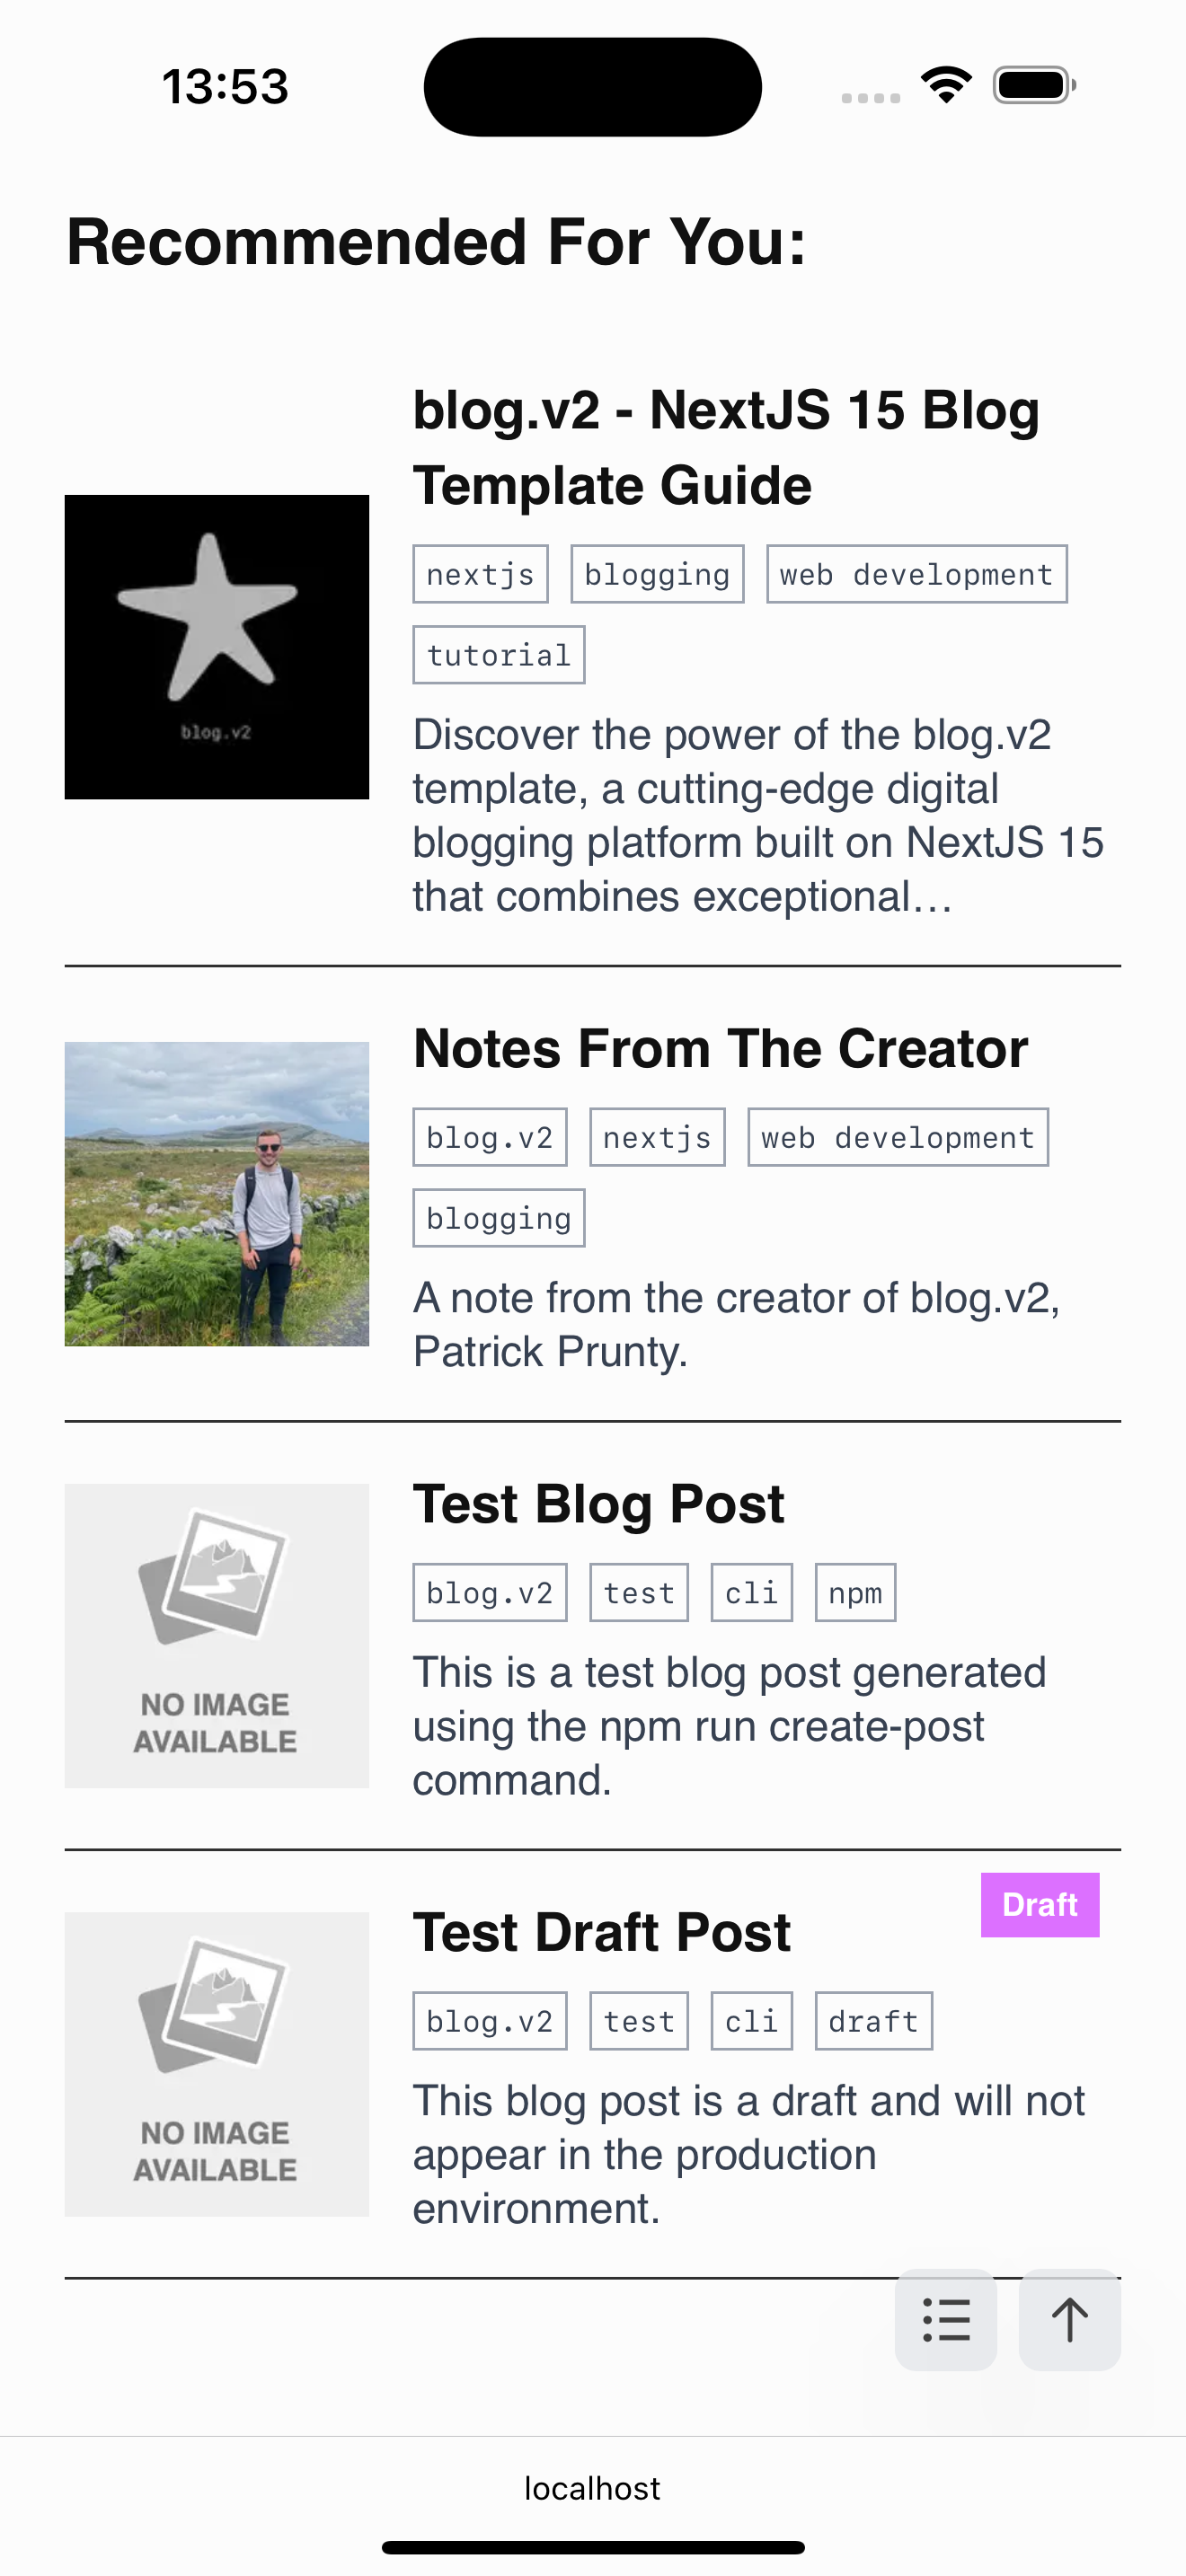
- 🔗 Recommended posts section using metadata keywords and randomization at the bottom of each blog post
- 🚀 Exceptional performance with 100% scores across Lighthouse metrics (performance, SEO, accessibility, best practices) on both mobile and desktop. Achieves a rapid Largest Contentful Paint of 0.3-0.6 seconds on desktop and 1.2-1.7 seconds on mobile for initial loads. Subsequent visits benefit from caching for even faster load times
- 🎨 Styled with Tailwind CSS for easy customization
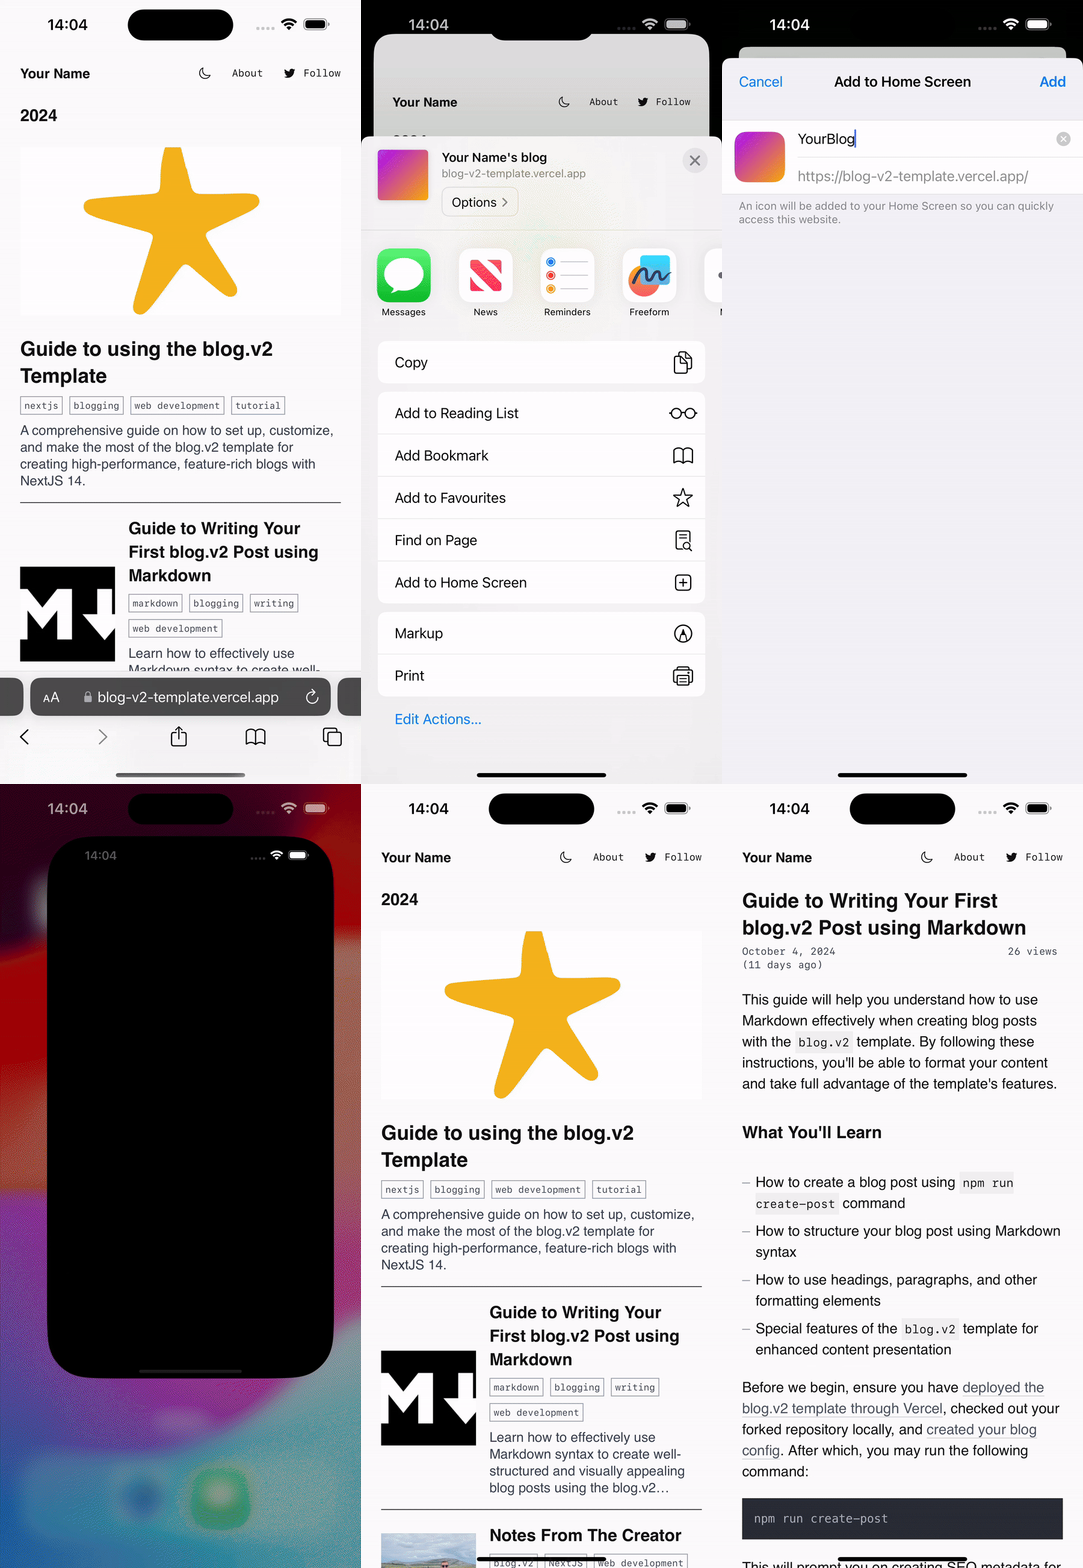
- 📱 PWA (Progressive Web App) enabled with caching for offline access using next-pwa
- 🖼️ Optimized and animated images for faster loading and optimal user experience
- 🤖 GitHub Dependabot integration for automated dependency updates
- 📊 Google Analytics integration
- 📜 Scroll restoration for blog posts when navigating back and forth between posts, preventing scroll position from resetting to the top of the page and refreshing the page
- 📤 Native Share API for easy social sharing on mobile devices
- 🔷 TypeScript support for enhanced type safety and developer experience
- 📊 View counter for blog posts using CounterAPI
- 📰 Draft labelled blog posts which are rendered in development mode but not in production
#Pre-Requisites
#Video Demonstration
The following video will guide you how to get started using the blog.v2 template. By the end of the video, you will
have a live website available at https://<your_name>.vercel.app which is high-performing, SEO optimized and customized
to your preference. Allowing you to share your personal website with your friends and if you like, write some content for your blog.
#Quickstart
Deploy your own customizable blog.v2 site with one click and for free via Vercel:
By clicking the button above, Vercel will automatically:
- Fork the blog.v2 template repository
- Set up a new project for you
- Deploy your site instantly to the interweb
Once deployed, you'll have a fully functional blog at your fingertips.
After deployment:
- Take note of your Vercel-assigned URL (e.g.,
<project_name>.vercel.app). You will need this to configure your blog later. - Optionally, update your URL or use a custom domain (i.e
<your_name>.vercel.app) by following Vercel's instructions.
Vercel will automatically deploy future pushes to your repository.
For reference to getting started with NextJS 15 App Router, see the NextJS 15 App Router Guide.
#Development
- Clone the repository you forked from this template via Vercel:
git clone https://github.com/<your_github_username>/<your_repository_name>.git - Navigate to the project directory:
cd <your_repository_name> - Install dependencies:
npm install - Build the project
npm run build - Run the development server:
npm run dev - Open http://localhost:3000 with your browser to see the result.
#Configuring Your Blog
After visiting http://localhost:3000 for the first time, you will be prompted to configure your blog.
You can always re-configure your blog by pressing the floating gear icon. This icon will not be visible in the live production deployment.
#Creating a New Blog Post
To create a new post, you can click on the floating plus icon
#Editing a Post
#Syncing Updates From the Core Template
To keep your forked blog.v2 template up to date with the latest changes from the original template repository, you can use the following steps. This process is often referred to as "syncing" or "updating" a fork:
- Navigate to your project's source code:
cd path/to/your-forked-repo - Add remote
upstreambranch for theblog.v2template.git remote add upstream https://github.com/pprunty/blog.v2.git - Verify that the new remote
upstreamwas added:git remote -v - Fetch Updates from the Original blog.v2 Template:
This will retrieve the latest changes fromgit fetch upstreamupstreambut won’t merge them into your local repository yet. - Checkout the branch in your fork where you want to apply the updates, typically
main:git checkout main - Merge the changes from upstream/main (or upstream/master, depending on the default branch of the original template) into your local branch:
git merge upstream/main - Resolve any merge conflicts, if present. Open conflicting files, make necessary edits, and mark the conflicts as resolved. Then commit the changes:
git add . git commit -m "Merge updates from upstream blog.v2 template" - If you're happy with the update, push the Updated Branch to Your Forked Repository and deploy new version of your blog.v2 template to Vercel:
git push origin main
#Features
#SEO Optimization & Automation
PWA (Progressive Web App) Enablement
blog.v2 is a Progressive Web App (PWA) powered by the next-pwa library. This allows the site to be installed on your device's home screen or desktop and accessed even when offline. next-pwa also enables caching for faster reloads.
To install the PWA:
- On desktop, click the install button in your Google Chrome browser.

- On mobile, select the "Add to Home Screen." This will vary by device and operating system, but it generally involves long-pressing the site URL and selecting the "Add to Home Screen" option.

Note
The title and icon for your PWA will use the "Title" and "Logo" selected in your blog configuration.
For more detailed information on PWA settings and options, refer to the next-pwa documentation.
#Markdown and MDX for Real-Time Editing
#Recommended Posts
The recommended posts feature suggests related content to readers after they finish a blog post. This is managed in the components/RecommendedPosts.tsx file.
The component uses basic keyword matching to find three posts related to the current post's metadata.keywords. It also includes one random post to diversify the recommendations.
If there are no keyword matches, the component will fill the remaining slots with random posts.
To customize the recommendation logic, you can edit the components/RecommendedPosts.tsx file.

#Lighthouse Performance
The blog.v2 template provides 100% scores across Lighthouse metrics (performance, SEO, accessibility, best practices) on both mobile and desktop out-of-the box.
The template also comes pre-configured with a Makefile which allows you to run lighthouse scores with the command:
make lighthouse URL=<https://<project_name>.vercel.app
Running the same command, make lighthouse, without a URL will give you the test results against the blog.v2's template
site, found at https://blog-v2-template.vercel.app/. You can use this to determine whether development changes you have made to the template has effected the
performance of the application.
The template achieves a rapid Largest Contentful Paint of 0.3-0.6 seconds on desktop and 1.2-1.7 seconds on mobile for initial loads. Subsequent visits benefit from caching for even faster load times.
Google Chrome Lighthouse Results:
| Run # | Performance | Accessibility | Best Practices | SEO | PWA | Time to Interactive (ms) | Speed Index (ms) |
|---|---|---|---|---|---|---|---|
| 1 | |||||||
| 2 | |||||||
| 3 | |||||||
| 4 | |||||||
| 5 | |||||||
| 6 | |||||||
| 7 | |||||||
| 8 | |||||||
| 9 | |||||||
| 10 |
Average Scores:
| Metric | Average Value |
|---|---|
| Performance | |
| Accessibility | |
| Best Practices | |
| SEO | |
| PWA | |
| Time to Interactive (ms) | |
| Speed Index (ms) |
#Upcoming Features
Upcoming features to be integrated in later versions of the blog.v2 template include:
- Google Ads integration (for monetization)
- Comments section under blog post
- Custom 404 page
- Subscription/newsletter signup
- i18n translation for translating blog posts into international languages
- Archive section for blog posts with search & sort functionality
- Pagination
- Archived posts
- Admin dashboard
You can make a feature request by completing the Feature Request Form.
#About Page
#Professional Use
#Contributing
Contributions to the blog.v2 are welcome and highly appreciated. However, before you jump right into it, we would like you to review our Contribution Guidelines to make sure you have a smooth experience contributing to blog.v2.
#Author(s)
#Contact
For personal or business enquires regarding the blog.v2 template and application, you can contact me through the following:
If you are contacting in regards to a feature request, please fill out the Feature Request form. For business enquires,
reach out to me directly via email with heading: blog.v2 Business Enquiry.


